Languages
15Forte de Nossa Senhora da Graça Audio Guide
Forte de Nossa Senhora da Graça is a landmark in Elvas, Portugal. Explore it with Stanza's GPS-triggered offline audio guide — available in 15 languages.
Quick Facts
18
Stops
15
Languages
100%
Offline
📍 Elvas, Portugal · 38.8946°N, -7.1642°E
About Forte de Nossa Senhora da Graça
This 18th-century star fort is a prime example of military architecture and is part of the Garrison Border Town of Elvas and its Fortifications UNESCO World Heritage site. It features an impressive central governor's house and extensive defensive bastions.
Forte de Nossa Senhora da Graça is also known as Forte de Lippe, Forte Conde de Lippe, Forte conde de lippe, Forte da graça, and 4 other names in various languages.
This self-guided audio tour features 18 narrated stops organized across 8 sections. As a fort, Forte de Nossa Senhora da Graça offers a unique cultural experience in the heart of Elvas, Portugal.
The Stanza audio guide is available in 15 languages and works entirely offline — download the complete tour including audio narration, maps, and images before your visit. As you walk through Forte de Nossa Senhora da Graça, GPS-triggered narration plays automatically at each point of interest.
Last updated:
What you will hear
Arrival: The Impregnable Star
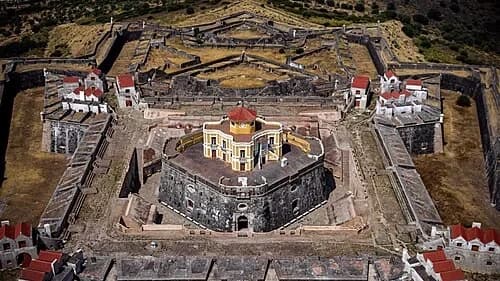
An introductory stop using an aerial view to establish the fort's complex star-shaped geometry, a hallmark of Vauban military architecture.
Aerial View of the Star Fort
From this perspective, the incredible geometry of the 'Star of Elvas' is revealed. Construction on this defensive giant began in 1763 under the direction of the German Marshal Wilhelm von Schaumburg-Lippe. It was a monumental undertaking that spanned twenty-nine years, finally reaching completion in 1792. The fort covers 11.25 hectares, making it one of the largest and most complex military structures of its kind. Its design follows the Vauban style, characterized by a pentagonal star shape. This geometry was not just for aesthetics; every angle was meticulously calculated to eliminate 'blind spots,' ensuring that defenders on the ramparts could cover every possible approach with overlapping fields of fire. Commissioned to be an impregnable defensive masterpiece on the Spanish border, the fort’s sheer scale and scientific precision represent the pinnacle of eighteenth-century military engineering. As you look at the nested layers of walls and bastions, consider the strategic foresight required to transform this hill, Monte da Graça, into a fortress that could never be taken by force.
The Monumental Dragon Gate
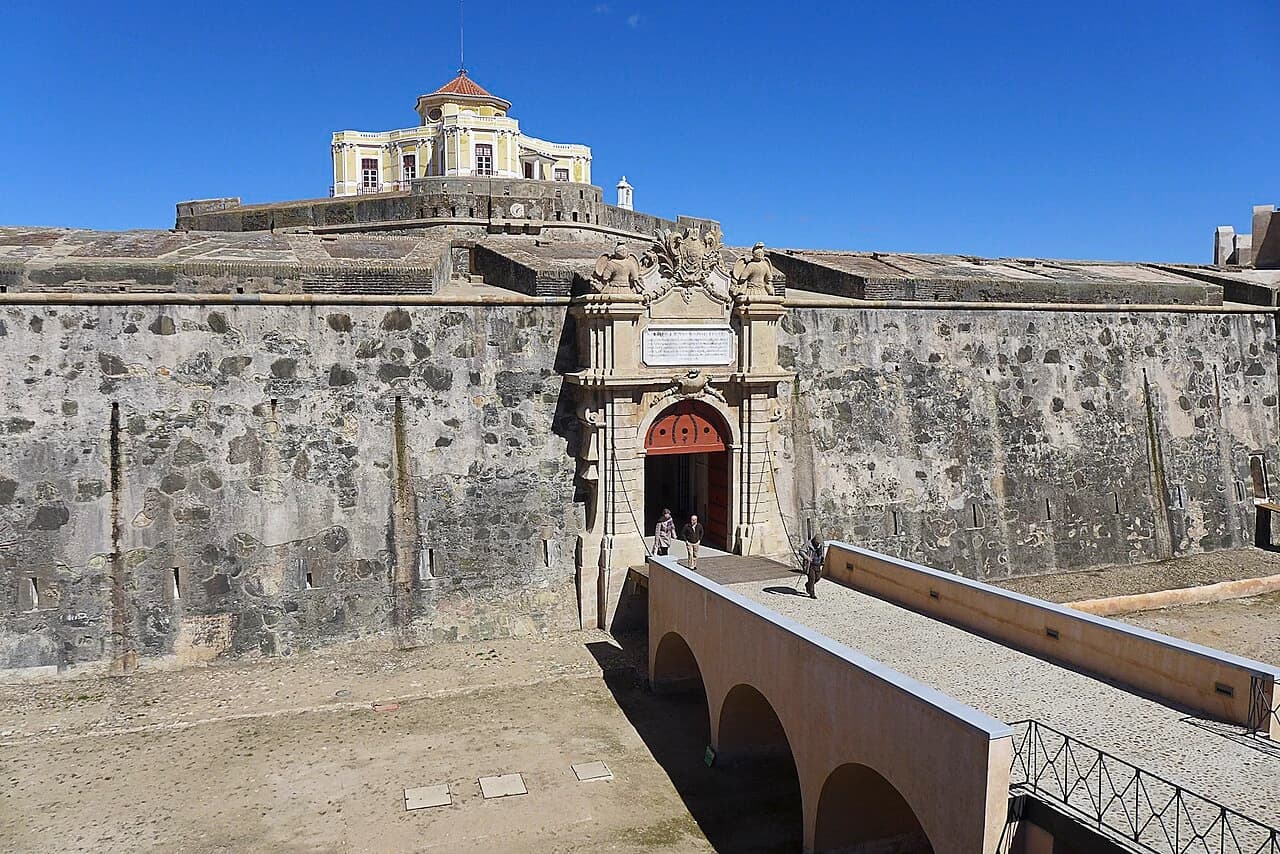
The primary entrance to the fort, featuring ornate stone carvings and defensive symbols that signal the site's importance.
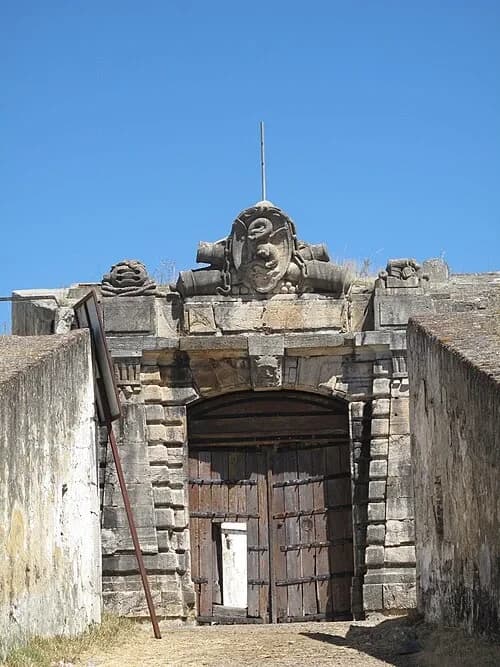
Carvings of the Dragon Gate
Above the entrance lintel, look closely at the intricate stone carvings that give this portal its name. A heraldic serpent, or dragon, is featured prominently alongside decorative cannons and other military motifs. These artistic flourishes provide a striking contrast to the brutal, utilitarian functionality of the surrounding defensive walls. While the rest of the fort is defined by its massive, unadorned stone and strategic angles, this gate includes decorative elements intended to broadcast the wealth and prestige of the Portuguese monarchy. The craftsmanship involved in these carvings suggests that even in a site dedicated to warfare, there was room for architectural pride and symbolic communication. The cannons carved into the stone serve as a permanent reminder of the fort's purpose, while the heraldry connects the site to the broader history of the kingdom. These details were meant to impress anyone approaching the gate, from high-ranking officials to foreign emissaries, reinforcing the idea that this was no mere border outpost, but a prestigious military jewel.
The Moat and Hornwork
Exploration of the outer defensive perimeter, showing the deep dry moat and the massive stone walls designed to keep invaders at bay.
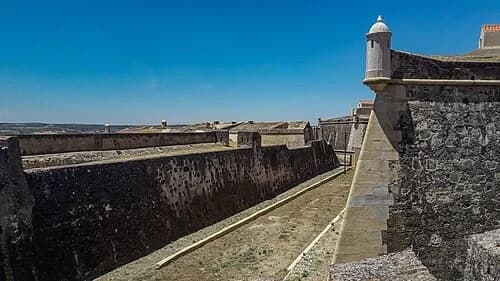
The Dry Moat
The sheer scale of the labor required to construct these walls is almost difficult to comprehend. Historical records indicate the project required six thousand men and four thousand animals working over nearly three decades. Unlike many medieval castles, this moat was never intended to hold water; it is a 'dry moat' purposefully designed to act as a killing zone. Any attacking force that managed to breach the outermost lines would find themselves trapped at the bottom of these deep ravines. Here, they would be completely exposed to lethal fire from the ramparts above, with no cover and no easy way to scale the sheer interior walls. Notice the remarkable precision of the stone joints, especially at the bastion corners. The masonry is so tightly fitted that it has resisted centuries of weathering. This level of craftsmanship ensured that the walls would not crumble under the impact of heavy artillery. The dry moat effectively transformed the landscape around the fort into a series of deadly obstacles designed to break the momentum of any ground assault.
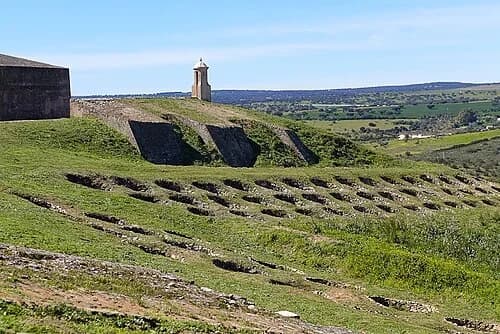
View of the Outer Defenses
Looking out from the ramparts, you can see the complex layers of defense that made this site so formidable. One of the most critical features is the glacis—the sloping earthwork that extends outward from the main walls. This design forced any attacking army to charge uphill while being fully exposed to the fort's defenders. There was nowhere to hide, as the slope was kept clear of trees or structures that could provide cover. Beyond the glacis, additional structures like the hornwork further complicated any approach, creating a maze of defensive fire. The fort was not just built for immediate defense; it was prepared for a long game. It was designed to hold enough provisions to sustain a garrison of two thousand men for up to two years. With its own internal water cisterns and massive storage vaults, it was nearly impossible to starve the defenders out. This combination of overlapping physical barriers and strategic self-sufficiency meant that any attempt to capture the fort through a siege would likely result in the attackers running out of supplies long before the defenders did.
The Ramparts and Sentry Boxes
A walk along the upper bastions, focusing on the strategic sentry boxes that offered views of the Spanish border.
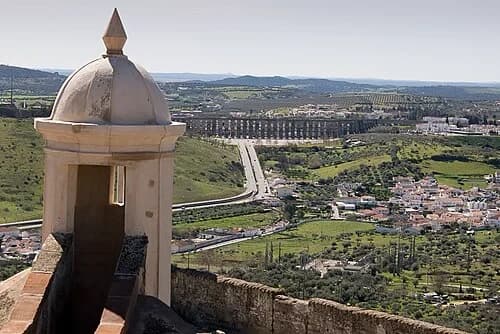
The Watchtower View
From this high vantage point, the strategic importance of Monte da Graça becomes clear. Looking out through the frame of the white sentry box, you can see the distant arches of the Amoreira Aqueduct stretching across the landscape. This high ground was so vital that military commanders of the era believed that whoever controlled this hill effectively controlled the entire city of Elvas. If an enemy were allowed to place artillery on this summit, they could bombard the city and its main defenses with ease. To prevent this, the Portuguese crown transformed the entire hilltop into this massive fortification. The view captures the stark beauty of the borderlands, a territory that was contested for centuries. The aqueduct, which provided the city with its water supply, was a lifeline that required constant protection. By occupying this peak, the garrison could oversee not just the immediate military approaches, but also the vital infrastructure that kept Elvas alive. This panoramic perspective reinforces how geography dictated the placement of every wall and bastion in this complex defensive system.
The Central Redoubt
Entering the heart of the fort, this circular structure served as the final line of defense and the core of garrison life.
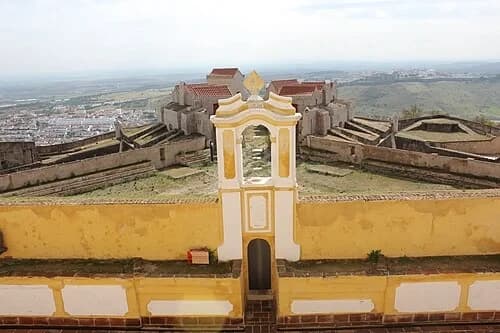
The Upper Ramparts
From the high vantage point of the redoubt's ramparts, the true genius of the fort's layout becomes evident. The overlapping star points were not just for show; they created a sophisticated system of defense where every single section of the outer wall could be protected by fire from a neighboring bastion. There were no 'dead zones' where an attacker could hide at the base of a wall without being targeted from the side. This geometry represents the culmination of centuries of military architectural evolution. As you look down, you can see the contrast between the rough, weathered stone of the lower defensive works and the brightly painted yellow and white residence of the upper redoubt. The lower sections were built for the grim reality of combat, with thick masonry designed to withstand cannon fire. In contrast, the upper residence offered a more refined environment for the officers. This separation of space highlights the military hierarchy of the eighteenth century, where the strategic command was physically and visually elevated above the soldiers who manned the heavy guns on the lower tiers.
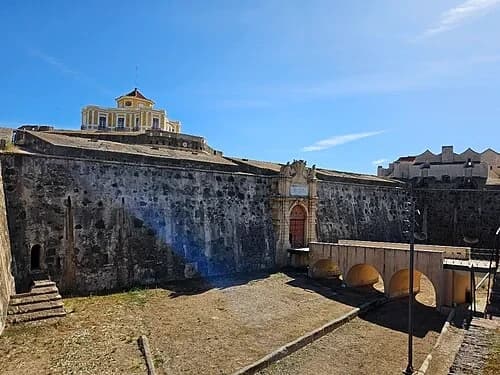
The Central Redoubt and Bridge
At the heart of the complex lies the central redoubt, essentially a 'fort within a fort.' This massive circular stronghold was the final line of defense. Even if an enemy managed to breach the outer star-shaped walls and navigate the moats, the garrison could retreat into this inner sanctum and continue the fight. By the nineteenth century, the fort had earned a reputation for being truly impregnable. It successfully resisted a Spanish siege in 1801 and survived heavy bombardment by French forces during the Peninsular War in 1811. Notice the striking visual contrast between the lower and upper sections of this structure. The base is constructed from dark, rugged stone designed to absorb the impact of artillery shells. Sitting atop this formidable foundation is the Governor’s House, distinguished by its vibrant yellow and white facade. This central hub housed the high command and served as the brain of the entire military machine. The bridge leading to the redoubt could be controlled or destroyed if necessary, further isolating the final defensive position from any attackers who had managed to enter the outer courtyards.
The Chapel Dome
A look inside the spiritual center of the fort, focusing on the impressive interior masonry and dome.
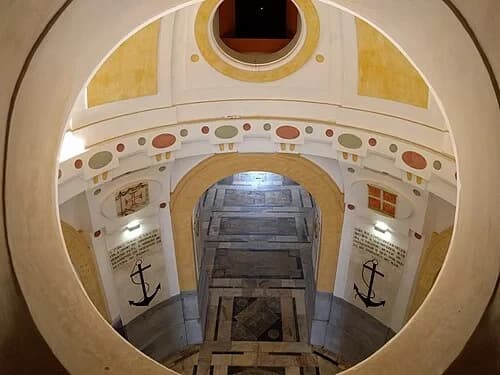
The Chapel Dome Interior
Looking up inside the chapel, you can see the intricate masonry of the dome, which demonstrates the same high-level craftsmanship found in the fort's defensive walls. The ceiling and walls are decorated with painted coats of arms and Latin inscriptions, many of which refer to the patrons and military leaders who supported the fort's construction. You might notice the anchors painted on the walls; these are references to the naval background of some of the figures involved in the project. The acoustics of this circular space were carefully considered, designed to carry the priest’s voice clearly to everyone gathered within the central redoubt. In an era where religion was a core component of daily life, the chapel provided a formal space for the garrison to fulfill their spiritual obligations. The combination of heraldry and religious iconography reinforced the connection between the church, the military, and the Portuguese crown. Every element, from the inscriptions to the decorative motifs, was intended to inspire the troops and honor the individuals who turned this strategic hilltop into one of the most formidable fortresses in Europe.
The Garrison Living Quarters
Exploring the interior rooms where soldiers lived, some of which still feature historical murals and inscriptions.
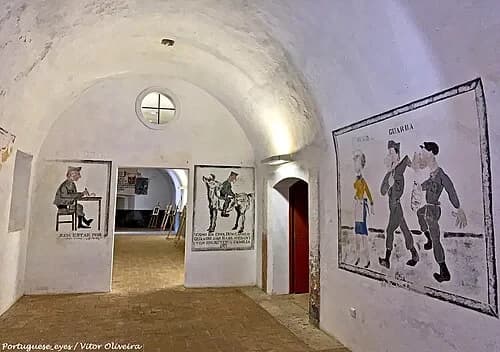
Garrison Room Murals
The vaulted walls of this garrison room are decorated with unexpected artwork. These caricatures were painted by the soldiers themselves, reflecting the long hours of boredom that often accompanied peacetime duty at the fort. While the structure was designed to hold two thousand men, during many years, only a small fraction of that number were actually stationed here. Their time was largely spent on maintenance and routine drills. These cartoon-style figures, including a soldier on a horse and another seated at a desk, offer a human perspective on life inside these massive stone walls. They suggest a sense of humor and a need for creative expression in an otherwise rigid military environment. Such murals are rare survivors of daily life from past centuries, as these utilitarian spaces were often whitewashed or left to decay once their military purpose ended. These drawings serve as a reminder that behind the grand strategy and architectural precision of the 'Star of Elvas' were thousands of individual men who had to find ways to occupy their time while standing guard on the frontier.
The Matchstick Masterpiece
A highlight of the museum exhibits, this detailed model helps visitors visualize the full scale of the fort's design.
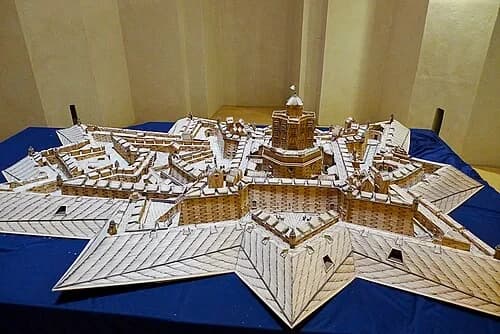
Detail of the Fort Model
Zooming in on the finer details of this model reveals the high degree of precision military engineers required when planning such a massive project. Notice the tiny, accurately placed sentry boxes on the corners of the bastions and the miniature staircase that climbs the side of the central redoubt. In the 1700s, long before computer-aided design, physical models like this were indispensable tools. They allowed engineers to visualize overlapping fields of fire and demonstrate complex defensive strategies to King José I and his court. Looking at the model, you can easily distinguish between the 'outer skin'—the series of defensive bastions and walls—and the inner 'crown,' which is the central command area and Governor's residence. This layered approach ensured that even if one section was compromised, the core remained protected. The model makes it clear how every architectural feature, from the slope of the walls to the height of the lookouts, was part of a calculated effort to remove any potential blind spots for the defenders. These miniature representations weren't just for display; they were the blueprints for a project that would require the labor of thousands of men and animals over nearly three decades.
Want to hear the rest?
Download the Stanza app to unlock all 18 stops and full GPS-guided navigation.
Frequently Asked Questions
How long does the Forte de Nossa Senhora da Graça audio tour take?
The Forte de Nossa Senhora da Graça audio guide includes 18 narrated stops. Most visitors spend 45 minutes to 1.5 hours exploring the complete tour, though you can listen at your own pace and skip or revisit any stop.
Is the Forte de Nossa Senhora da Graça audio guide available in my language?
Stanza supports 15 languages: English, Spanish, French, German, Italian, Portuguese, Russian, Japanese, Chinese, Korean, Arabic, Hindi, Polish, Dutch, Hebrew. Check the guide in the app to confirm the languages currently available for this tour.
Can I use the audio guide offline at Forte de Nossa Senhora da Graça?
Yes! Download the complete Forte de Nossa Senhora da Graça tour — including all audio, maps, and images — before your visit. The Stanza app works completely offline, so you don't need WiFi or mobile data at the venue.
How much does the Forte de Nossa Senhora da Graça audio guide cost?
The Stanza app is free to download. Free and paid audio guides are available; current prices are shown in the app.
How do I use the Stanza audio guide at Forte de Nossa Senhora da Graça?
Download the free Stanza app, search for "Forte de Nossa Senhora da Graça", and download the tour. When you arrive at the venue, the app uses GPS to detect your location and automatically plays the relevant narration as you move between points of interest — completely hands-free.
What makes the Stanza audio guide different from other Forte de Nossa Senhora da Graça tours?
Stanza offers GPS-triggered narration that plays automatically as you walk through Forte de Nossa Senhora da Graça — no need to manually select stops. The tour is available in 15 languages, works fully offline, and includes 18 expertly narrated stops with images and historical context.
What other audio guides are available near Forte de Nossa Senhora da Graça?
Stanza offers multiple audio guides in Elvas, Portugal and nearby areas. After downloading the app, browse the map to discover all available tours near Forte de Nossa Senhora da Graça. Each guide can be downloaded for offline use.