Languages
15HMS Victory Audio Guide
HMS Victory is a museum in Portsmouth, United Kingdom. Explore it with Stanza's visual scanner and offline audio guide — available in 15 languages.
Quick Facts
16
Stops
15
Languages
100%
Offline
📍 Portsmouth, United Kingdom · 50.8018°N, -1.1096°E
About HMS Victory
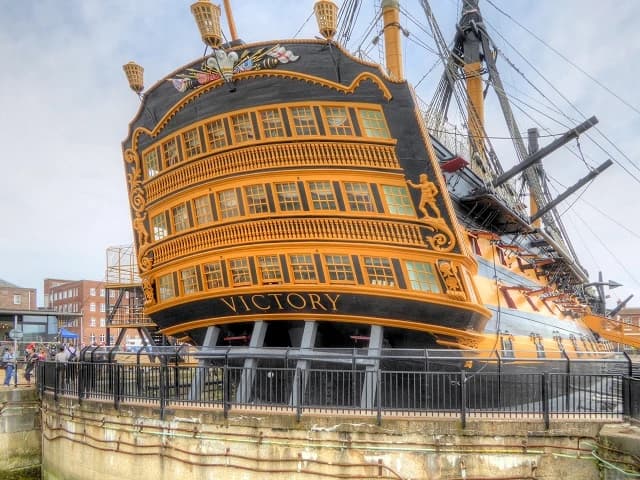
HMS Victory is a historic 1765 first-rate ship of the line that famously served as Lord Nelson's flagship at the Battle of Trafalgar. It is currently preserved as a museum ship in the Portsmouth Historic Dockyard.
HMS Victory is also known as Victory.
This self-guided audio tour features 16 narrated stops organized across 7 sections. As a maritime museum, HMS Victory offers a unique cultural experience in the heart of Portsmouth, United Kingdom.
The Stanza audio guide is available in 15 languages and works entirely offline — download the complete tour including audio narration, maps, and images before your visit. As you walk through HMS Victory, GPS-triggered narration plays automatically at each point of interest.
Last updated:
Artworks on display
The Middle Gundeck and Entrance
The primary entry point for modern visitors, introducing the cramped reality of naval warfare.
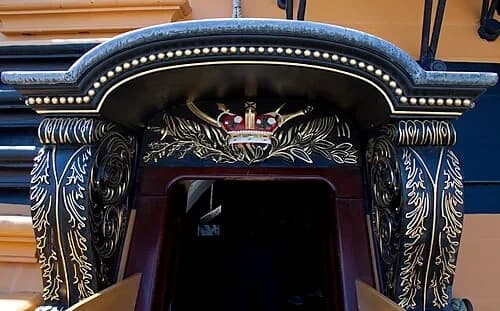
The Main Entryway
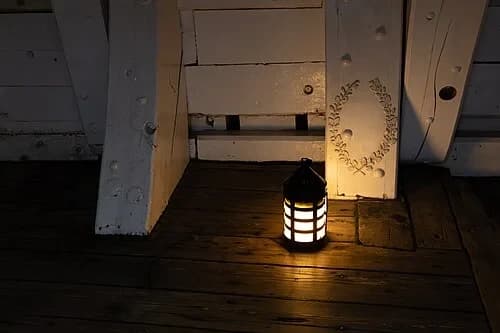
Entering through the middle gundeck brings you into the enclosed world of the 18th-century Royal Navy. Above the entry, look for the decorative carvings of a crown and laurel wreaths. These fine details signaled to those boarding that they were entering a space of strict discipline and royal service. For the crew, this threshold marked the boundary between the outside world and a self-contained, high-pressure society. Once inside, the environment changes immediately. The ceilings are low, the air becomes heavy with the scent of tar and old wood, and the natural light of the dockyard fades. This deck was a hub of constant activity, housing both the massive cannons used in battle and the daily activities of the sailors. Moving through this entryway, the sheer density of the ship's construction becomes apparent. Thick oak timbers surround you, designed to withstand the impact of heavy iron shot. This was the workspace for hundreds of men who spent months or years at sea without ever leaving the confines of these wooden walls.
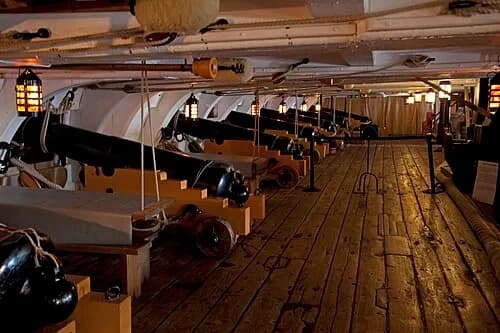
The Middle Gundeck
This deck is lined with 24-pounder cannons, named for the weight of the solid iron balls they fired. Each of these guns weighs approximately 2.5 tons, and operating them was a feat of raw physical strength and precise teamwork. During a battle, a crew of several men worked in unison to haul the massive gun back from the port, clean the barrel, load the powder and shot, and then heave the gun forward again. Notice how low the overhead beams are; sailors had to move with practiced agility to avoid injury in these cramped quarters. Between the guns, you can see lanterns hanging from the ceiling. In the smoke-filled chaos of an engagement, these lanterns provided the only light available in this windowless workspace. The deck would have been a deafening environment of shouting officers, the creak of heavy ropes, and the thunderous roar of the cannons firing in succession. Every inch of this space was utilized, with equipment and supplies tucked into every available corner to keep the gun crews functional during long hours of combat.
The Lower Gundeck
Illustrates the visceral conditions faced by the 850-man crew, housing the ship's heaviest firepower.
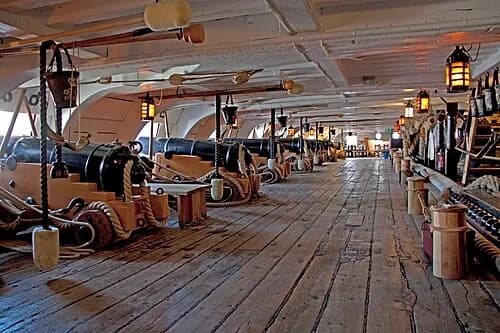
The Lower Gundeck
As the lowest deck above the waterline, this area holds the ship's most formidable weapons. The 32-pounder cannons seen here were the heavy artillery of the sea. While they could technically fire a ball over a mile and a half, they were most lethal at point-blank range. From just a few yards away, these iron projectiles could shatter two feet of solid oak hull, sending deadly wooden splinters flying through the enemy's decks. During a full engagement, the majority of the ship’s 850 men were stationed on the gundecks. The logistics of coordinating such a large force in these dark, confined spaces were staggering. Powder monkeys—often young boys—ran back and forth from the magazine deep below, carrying cartridges to the gun crews. The floor here was often gritted with sand to prevent the men from slipping on blood or seawater. Standing among these massive guns, you can appreciate the sheer density of the ship's firepower. A single broadside from these 32-pounders could decide the fate of an entire naval battle in a matter of minutes.
The Cockpit and Nelson's Death
The most somber part of the ship, where the surgeon operated and where Admiral Nelson spent his final hours.
The Death of Nelson
Deep within the hull lies the cockpit, the lowest and safest part of the ship. On October 21, 1805, this area was filled with the wounded and dying, as it served as the primary station for the ship's surgeon. It was here that Admiral Horatio Nelson was carried after being struck by a sniper's bullet on the quarterdeck above. Because this space was below the waterline, it was protected from direct enemy fire, providing a grim but necessary refuge for medical treatment. The atmosphere here during the battle was dark, hot, and suffocating, lit only by flickering candles and lanterns. As Nelson lay here, he repeatedly asked about the progress of the fight, desperate to know if his fleet had secured a victory. Although the British triumph was being won on the decks far above, the news of the decisive success only reached the Admiral moments before he passed away. Today, the space is preserved as a quiet place of reflection, marking the exact spot where one of history's most celebrated naval commanders drew his last breath.
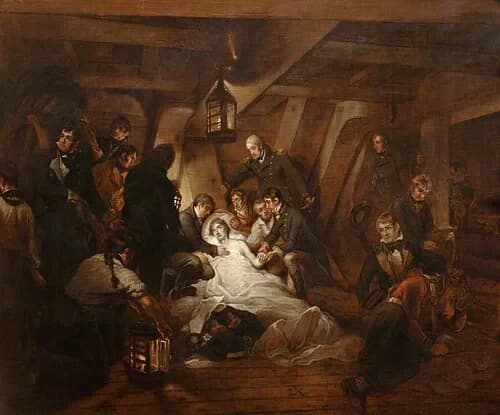
The Death of Nelson
Arthur William Devis · oil paint, canvas
This illustrative artwork helps us visualize the conditions inside the ship during the Battle of Trafalgar. The artist, Arthur William Devis, went to great lengths to ensure accuracy, even sketching the officers who were actually present. The painting emphasizes the cramped, candle-lit environment of the cockpit, which was the surgeon's primary workspace during an engagement. You can see the heavy oak beams and the low ceiling, which forced the men to stoop as they gathered around the dying Admiral. Nelson had been struck by a musket ball earlier that afternoon while pacing the quarterdeck. To prevent the crew from losing heart at the sight of their fallen leader, he was quickly covered and carried down to this protected lower deck. The faces of the officers and crew in the painting reflect the deep emotional toll of the moment; Nelson was famously beloved by his men, and his loss was felt as a personal blow to the entire fleet. The scene serves as a bridge between the clinical reality of the medical station and the legend that grew around Nelson's final victory.
The Upper Gundeck and Galley
Focuses on the logistics of survival at sea, from food preparation to medical care.
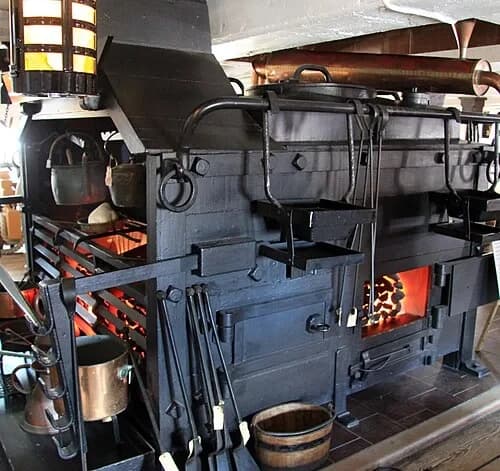
The Brodie Stove
This massive iron structure is the Brodie stove, a technological marvel that allowed the ship to sustain a crew of 850 men for months at a time. Every day, the ship's cooks used this stove to prepare meals of boiled salt beef, pork, or pea soup. However, the stove did more than just cook food. Look at the copper pipe system on the back; this was an ingenious distillation unit that could turn salt water into fresh drinking water. This feature was a critical survival tool for long voyages across the Atlantic or Mediterranean where fresh water was scarce. Despite its utility, the stove represented a significant risk. This was the only open fire permitted on the entire vessel. On a ship constructed entirely of dry oak, tar, and hemp, a fire breaking out here could be more dangerous than an enemy broadside. For this reason, the fire was strictly managed and extinguished during battles or heavy weather. The stove sits on a base of heavy tiles to prevent the heat from charring the wooden decks below, illustrating the constant balance between necessity and safety on a wooden warship.
The Quarterdeck
The command center where Nelson stood during battle and where he was struck by a sniper's bullet.
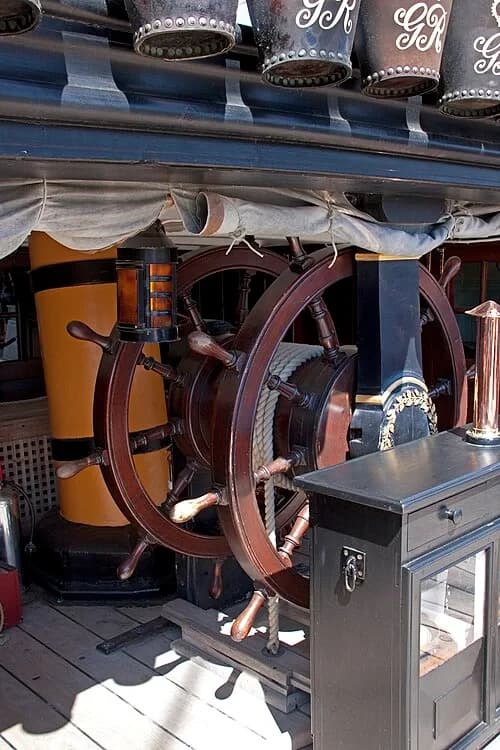
The Ship's Wheel
Standing on the quarterdeck, you can see the double ship's wheel. This is the command center from which the vessel was steered. In calm weather, a single helmsman might handle the wheel, but in heavy storms or during the maneuvers of a battle, it could take up to four men to hold it steady against the immense pressure of the water hitting the rudder. The wheel is connected to a series of ropes and pulleys that run down through several decks to the tiller room at the very rear of the ship. This mechanical system translated the rotation of the wheel into the movement of the massive wooden rudder. It was near this spot, while pacing the quarterdeck, that Admiral Nelson was shot. A sniper in the rigging of the French ship 'Redoutable' spotted the Admiral's distinctive uniform and fired, the ball passing through his shoulder and into his spine. Despite the danger of being exposed on this open deck, commanders like Nelson remained here to maintain clear visibility and direct their fleet with confidence during an engagement.
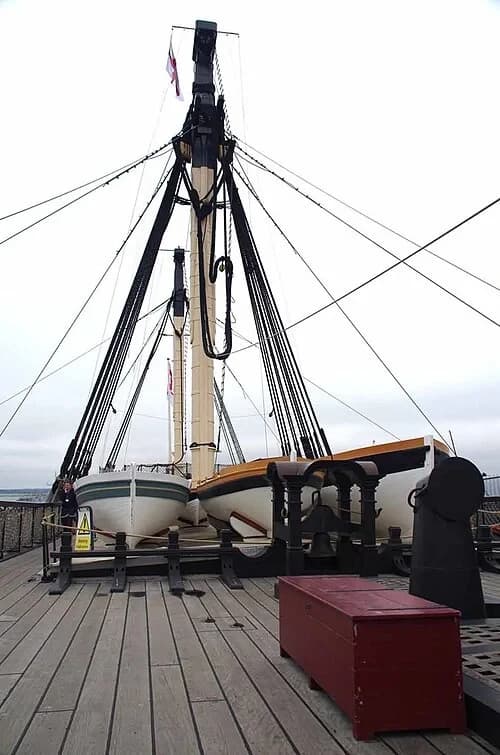
Boats of the Fleet
The open area of the deck is used to store the ship's smaller boats. These vessels were vital to the ship's daily operations and served several distinct roles. They were used to ferry the Admiral and his officers between ships or to shore, and they acted as lifeboats in the event of an emergency. More importantly, these boats were used for 'warping'—a process where the crew would row an anchor out a distance from the ship, drop it, and then use the ship's capstan to pull the massive vessel forward into position. Because this was a flagship, these boats were frequently seen leading the fleet in formation or carrying important dispatches between commanders. From this vantage point, you can also look up and see the sheer height of the rigging. The masts rise over 60 meters into the air, supporting miles of hemp rope and thousands of square yards of canvas. The boats themselves were maintained with the same care as the main ship, as they were often the only means of communication or escape in the middle of the ocean.
The Great Cabin
The Admiral's living and working quarters, where strategic decisions that changed history were made.
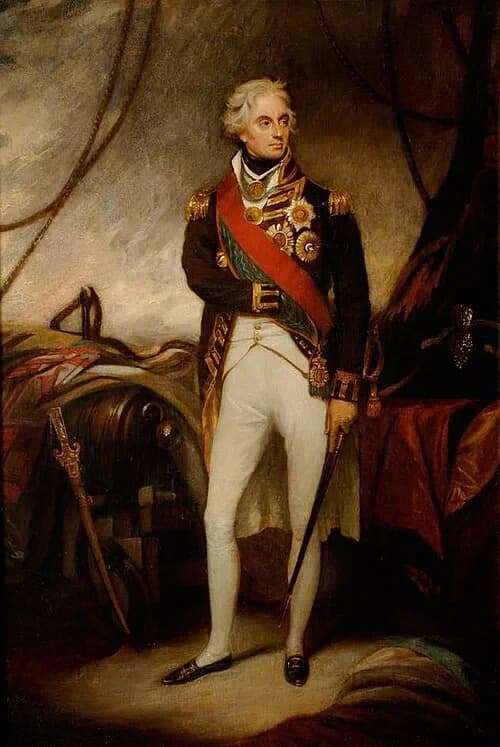
Horatio Nelson (1758–1805)
William Beechey · oil paint, paper
This portrait shows the man behind the legendary status of this ship. Horatio Nelson was a commander of exceptional skill and personal bravery. In the painting, you can see the physical evidence of his long career: his missing right arm, lost during the Battle of Santa Cruz de Tenerife, and his damaged right eye, injured by flying sand and stone during the siege of Calvi. Nelson's leadership style was revolutionary for the time. He was famously adored by his sailors because he took a deep interest in their health and welfare, and he never asked his men to take a risk that he would not share himself. His victory at Trafalgar was so decisive that it ended the threat of a French invasion of Britain and established the Royal Navy as the unchallenged master of the seas for the next hundred years. Although he died on this ship before the battle ended, his body was preserved in a cask of spirits and returned to England for a hero’s funeral. He remains one of Britain's most celebrated national figures, synonymous with courage and naval excellence.
Restoration and the Stern
Concludes the tour by looking at the ship's ornate architecture and the modern efforts to keep her 'afloat' in dry dock.
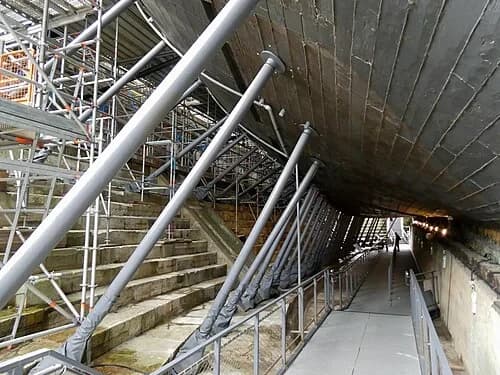
The Battle Against Decay
Standing beneath the hull, the sheer scale of the ship is most apparent. Since 1922, the Victory has rested here in Dry Dock No. 2 to prevent the hull from collapsing under its own massive weight. Without the buoyancy of water, the ancient timber structure would gradually flatten and splinter over time. The network of modern steel supports and extensive scaffolding you see are part of an ongoing multi-million pound conservation effort. This project aims to replace thousands of feet of rotting oak and combat the destructive appetite of the Deathwatch beetle, a wood-boring insect that has plagued the ship for decades. Preservation hasn't always been the priority, however. In 1831, the Admiralty considered breaking the ship up for its scrap wood. This proposal sparked such intense public outrage that the plan was abandoned, forcing the Navy to preserve the vessel as a national icon. Today, the maintenance continues using modern structural engineering. The steel props are carefully padded at their base to distribute pressure evenly against the historic hull planks.
Want to hear the rest?
Download the Stanza app to unlock all 16 artworks and the visual scanner feature.
Frequently Asked Questions
How long does the HMS Victory audio tour take?
The HMS Victory audio guide includes 16 narrated stops. Most visitors spend 45 minutes to 1.5 hours exploring the complete tour, though you can listen at your own pace and skip or revisit any stop.
Is the HMS Victory audio guide available in my language?
Stanza supports 15 languages: English, Spanish, French, German, Italian, Portuguese, Russian, Japanese, Chinese, Korean, Arabic, Hindi, Polish, Dutch, Hebrew. Check the guide in the app to confirm the languages currently available for this tour.
Can I use the audio guide offline at HMS Victory?
Yes! Download the complete HMS Victory tour — including all audio, maps, and images — before your visit. The Stanza app works completely offline, so you don't need WiFi or mobile data at the venue.
How much does the HMS Victory audio guide cost?
The Stanza app is free to download. Free and paid audio guides are available; current prices are shown in the app.
How do I use the Stanza audio guide at HMS Victory?
Download the free Stanza app, search for "HMS Victory", and download the tour. When you arrive at the venue, the app uses GPS to detect your location and automatically plays the relevant narration as you move between points of interest — completely hands-free.
What makes the Stanza audio guide different from other HMS Victory tours?
Stanza offers GPS-triggered narration that plays automatically as you walk through HMS Victory — no need to manually select stops. The tour is available in 15 languages, works fully offline, and includes 16 expertly narrated stops with images and historical context.
What other audio guides are available near HMS Victory?
Stanza offers multiple audio guides in Portsmouth, United Kingdom and nearby areas. After downloading the app, browse the map to discover all available tours near HMS Victory. Each guide can be downloaded for offline use.